Digital Photography and Imaging / Project 1

22.4.2024 - 02.6.2024 / Week 1 - Week 6
GAN YI KIAN / 0374572
Digital Photography and Imaging / Bachelor of Design (Hons) in Creative Media
Project 1 / COLLAGE & DIGITAL IMAGING
Lectures
Week 1 / Introduction to Digital Photography & Imaging
1. Introduction to Digital Photography & Imaging.
2. Introduction Photography
3. The importance of Photoshop
4. Photograph manipulation
4. Photograph manipulation
5. The invention of Photoshop
6. Digital Imaging
7. Assignment Projects briefing
- Introduction to Google Drive and Online Portfolio- Creating E-Portfolio
Then start project 1. First, go to Pinterest to find 3 favorite graphic design composition works and then explain why you like these designs.
Week 2 / Introduction to basic composition
1. Introduction to basic composition.
- Focal Point
- Scale & Hierarchy
- Balance The Elements
- White Space
2. Rule of Thirds.
- Use composition techniques that are in line with what’s naturally pleasing to the eye.
- Creatively use negative space.
- Create conversation between the subject and background.
3. Golden Ratio.
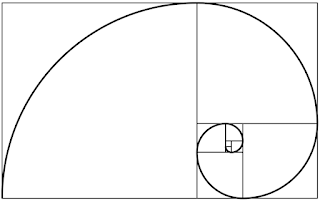 |
| Fig 1.1 Golden Ratio |
4. Composition [Framing & Cropping]
This week we will complete Collage layering elements & composition.
Week 3 / INTRODUCTION TO PHOTOSHOP 2
- Lasso tool
- Pen tool
- Layering
We also can play the bezier game learn about how to use pen tool and practise.
 | |
|
Week 4 / Introduction to Photoshop 3
Adjustment Layer & Filters
1. BRIGHTNESS / CONTRAST
2. LEVEL
3. CURVES
4. EXPOSURE
5. SELECTIVE COLOR
Filters
Photo filter trick in Photoshop: https://youtu.be/gDSbfx67ML
Week 5 / BASIC PHOTOGRAPHY SHOOTING
EXPOSURE SETTING :
In photography, exposure is the amount of light which reaches your camera sensor or film.
The main parts of the camera:
Camera body:
- Shutter
- Image sensor
- LCD screen
Camera lens:
- Aperture/ Iris
The camera body is a light proof box.
There are only two camera settings that affect the actual “luminous exposure” of an image: shutter speed and aperture. The third setting, camera ISO, also affects the brightness of your photos.
IRIS : Iris/Aperture is control the flow of light entering the lens.
measured by f-stop, indicated by sequence of f-number: f/1, f/1.4, f/2 , f/ 2.8, f/ 4, f/ 5.6, f/ 8, f/ 11, f/ 16, f/22 , f/32..
SHUTTER SPEED : The shutter is a small plastic sheet that opens and closes to allow light onto the film or prevent light from reaching the film.
measured in seconds: 1/1000 s,1/500 s,1/250 s,1/125 s,1/60 s,1/30 s,1/15 s,1/8 s,1/4 s,1/2 s,1 s, 2 s, 3 s…
The common ISO camera settings are: 100, 200, 400, 640, 800, 1600, 3200, 6400….
The lower the number of ISO the less sensitive your camera is to light and the finer the grain.
LENS PERSPECTIVE
Different lenses are designed for different for different purposes. Lenses can be categorized by FOCAL LENGTH.
FOCAL LENGTH: The shorter the focal length, the wider the angle of view and vice-versa. Focal length is the measurement (in millimeters) from the optical center of a camera lens to the camera’s sensor.
DEPTH OF FIELD: The proportion of the image that is reasonably sharp and in focus.The smaller the aperture you use, the greater the depth of field.
Week 6 / POSTER DESIGN
The 7 principles of poster design
The principles of design are the rules a designer must follow to create an effective and attractive composition.
- Emphasis
- Balance and alignment
- Contrast
- Repetition
- Proportion: The visual size and weight of elements in a composition and how they relate to each other. It often helps to approach your design in sections, instead of as a whole.
- Proportion: Movement is controlling the elements in a composition so that the eye is led to move from one to the next and the information is properly communicated to your audience.
- White Space
INSTRUCTIONS
PROJECT 1A: COLLAGE DESIGN ELEMENTS
1. Choose and identify collage's design elements to be cut out and compose it into own concept & story.
2. Pre compositing your collage's design elements into a composition.
3. Take 3 photo of collage pre-composition and insert it on the section below.
4. Submit (Turn In) this W2_COLLAGE ELEMENTS.
 |
| Fig 2.1 Picture |
 | |
|
This is the seat that Mr Hamzah helped me adjust. It makes better use of the space next to it to make the work look richer. However, Mr Hamzah also suggested that I change the background to make the effect look better.
Final Product
 | |
|
I followed Mr Hamzah's advice and purchased a background image that looks good and fits the theme. It felt very textured and looked great, so I attached the paper cutout and this is the final result.
PROJECT 1B: DIGITAL COLLAGE
1. Download all of the images here
https://drive.google.com/drive/folders/1cGcbENrjSksAaMQK9np2jb6ZaM7Y-81l?usp=sharing
2. Follow this tutorial demo as reference to create digital collage:
https://youtu.be/BlW7F-fTsbE
3. Create 3 different composition digital collages from the images that you’ve downloaded.
4. Create A4 canvas size (vertical) on Photoshop and start to do the compositions.
5. Take 3 photo of your digital collage compositions and insert it on the section below.
6. Submit (Turn In) this file on Google Classroom.
First, I create A4 canvas size (vertical) on Photoshop
 | |
|
and using images from Mr Fauzi to start my design.
I mostly use pen tool and magic tool to select the shape I want
 | |
|
I created three works, my personal favorite #1, and Mr Hamzah also gave me feedback good job.
 | |
|
"Attach your best composition from the WEEK 3 digital collage exercise below.
Using the same Photoshop file, improvise your WEEK 3 digital collage into WEEK 4 by using Adjustment Layers & Filters on Photoshop.
Explain what you’ve learned in the description section."
I choose the #1 works to adjust layers & filters.
 | |
|
First I changed the two fish's colors and the plant's color
In the old projector and people walking picture, I lower their opacity.
Final Product
 | |
|
I added different special effects to each picture. From my point of view, I think this effect and composition is good.
PROJECT 1B: DIGITAL IMAGING EXERCISE
PART 1: Hearst Mansion
Follow the quick tutorial to understand how to use:
- Quick Selection Tool
- Layer Mask
- Filters
- Color Correction
First, I select the shape of the shazam
 |
| Fig 4.1 Shazam |
Then put the shazam into another background image
 | |
|
 | |
|
Adjust the color of the shazam to make it more consistent with the background
 | |
|
 | |
|
After adding the shadow, adjust the color to make it look more natural.
 | |
|
PART 2 (My Reflection)
I first select me from the photo and put it in the corner of the shazam.
 |
| Fig 5.1 Me |
After adding the shadow, I also copied one more and made a reflection.
 | |
|
Finish
But I look a little funny
 | |
Feedback |
Mr Fauzi : That’s a great progress. I’ve checked the whole process of your Project 1. Good exploration on the Shazam exercise. Your photo and reflection is good.
PROJECT 1B - PART 2: Recoloring Black and White
Follow instructions from the W6_RECOLORING BREAKDOWN:
EXERCISE 1: https://bit.ly/3dXGYu8
EXERCISE 2: https://bit.ly/3rpZvCp
EXERCISE 1
Turn B&W photo into COLOUR photo
 | |
|
Finish
 |
| Fig 6.2 RECOLORING |
EXERCISE 2
Recoloring B&W photo- Advanced level
 |
| Fig 6.3 B&W photo |
 |
| Fig 6.4 B&W photo |
Finsih
 |
| Fig 6.5 B&W photo |
Project 2: Digital Imaging exercise 02-PART2
I decided to recolor Kobe's photo, cause he is my legend.
 |
| Fig 7.1 Kobe photo |
 | |
|
Finish
 | |
|
For me, I think the big challenge is the lines next to the clothes, there are difficult to select.
REFLECTIONS
In my opinion, Digital Photography and Imaging is a course that we can see every day in our lives. Now we are just learning its theory and how to make better use of it. I think this course is very interesting and can expand our creativity very well. I also learned many illustrator tools and filters and other techniques from Project 1.


Comments
Post a Comment